What is Home Assistant?
Home Assistant (HA) is a very flexible, open-source home automation platform that acts as a local, central operating system for smart devices. Unlike cloud-dependent ecosystems, Home Assistant runs entirely within your local network (usually on a Raspberry Pi or home server). It consolidates data from hardware vendors, energy monitors, and IoT devices into a unified, secure and user-configurable dashboard.
Benefits for Home Owners & AlphaMon Users
- Complete Privacy: Your energy usage, solar data, and household metrics are stored locally. No third-party data tracking.
- Unified Control: View your AlphaMon power data alongside your smart lights, air conditioners, and batteries in one unified interface.
- Smart Energy Automation: Automatically turn on high-draw appliances (like pool pumps or EV chargers) the exact moment AlphaMon detects excess solar export.
- Beautiful Dashboards: Build customizable real-time dashboards accessible from any computer, tablet, or smartphone.
By connecting AlphaMon to Home Assistant, you can view real-time grid metrics, automate household appliances based on energy pricing spikes, and log long-term utility performance data without relying on external cloud infrastructure.
Choosing Your Home Assistant Environment
The Home Assistant ecosystem offers several installation options depending on your technical comfort level:
Turnkey Hardware (Recommended for Beginners)
If you want a plug-and-play experience without managing servers, Home Assistant offers dedicated hardware hubs:
- Home Assistant Green: An affordable, energy-efficient box. Plug in power and network, and it is ready instantly.
- Home Assistant Yellow: A premium hub built for power users. It features an integrated Zigbee/Thread antenna and slot expansion for high-speed SSD drives.
Virtual and Server Installations
For Linux users who already own an active, always-on computer, Home Assistant can be installed as software:
- Virtual Machine (KVM/VirtualBox): Runs the complete Home Assistant OS (HAOS) inside an isolated wrapper. This gives you the official Add-on store and automated backups.
- Docker Container: A lightweight setup for Linux servers, though it requires manual management of auxiliary applications.
HA can also be installed in a Windows Desktop environment, however we’ll not cover that here since HA is primarily designed to be run on always-on servers.
Since we can’t cover every operating environment here, the following sections how to install HA on a Linux (Ubuntu) server or Mini PC. Consult the official HA website for installation instructions for other environments.
Step 1: Verify Hardware Virtualization
HA runs in either a Docker environment or a KVM hypervisor environment. We’ll proceed with the KVM installation below because it is simpler and better supported for most users. Ths following installation steps assume your Linux server is KVM capable and running a standard Linux distro such as Ubuntu, with Apache2 installed as the default web server.
Log into your Ubuntu terminal and ensure your BIOS virtualization is turned on by running the kvm-ok utility:
$ kvm-okIf kvm apps are supported by your server you should see the following response:
$ kvm-ok
INFO: /dev/kvm exists
KVM acceleration can be used
Step 2: Install Virtualization Tools
Run these commands to download the KVM hypervisor tools:
sudo apt update
sudo apt install -y qemu-kvm libvirt-daemon-system libvirt-clients bridge-utils virtinst
Step 3: Download and Extract the HAOS Disk Image
Create a directory, download the official KVM package (haos_ova-14.2.qcow2.xz), and extract it using the unxz utility, which may take a minute or two (be patient):
sudo mkdir -p /var/lib/libvirt/images/haos
cd /var/lib/libvirt/images/haos
sudo wget -L https://github.com/home-assistant/operating-system/releases/download/14.2/haos_ova-14.2.qcow2.xz
sudo unxz haos_ova-14.2.qcow2.xz
Step 4: Provision the Virtual Machine
The following steps will create a KVM hypervisor on your server which will have it’s own network address and disk storage mappings. You’ll be using a dedicated console window to access the KVM resources.
Execute this command to launch the background virtual machine with the required UEFI boot parameters:
sudo virt-install \
  --name homeassistant \
  --os-variant generic \
  --ram 2048 \
  --vcpus 2 \
  --disk /var/lib/libvirt/images/haos/haos_ova-14.2.qcow2,bus=sata \
  --graphics none \
  --boot uefi \
  --network bridge=virbr0,model=virtio \
  --import \
  --noautoconsole
Next, set the KVM machine to start automatically whenever your server reboots:
sudo virsh autostart homeassistantStep 5: Network Configuration & Critical Cross-Network Solutions
Because KVM places Home Assistant inside an isolated private bridge (for example, 192.168.122.x), any devices connected to your home LAN such as your Windows desktop PC cannot talk to it directly. To resolve this issue we’ll use the Apache2 web server app as a Reverse Proxy using WebSockets to bridge this gap.
The Apache2 Gateway Configuration:
⚠️ Gotcha Warning: Ensure the target IP matches your VM’s bridge address (verify using the arp command below).
arp -e -i virbr0Next, assuming your KVM has an internal V4 IP address of 192.168.122.166, create a site configuration file using your preferred text editor on your Ubuntu host at /etc/apache2/sites-available/homeassistant.conf and populate it with the following text.
NOTE: Missed trailing slashes or incomplete IP paths will instantly trigger 500 Internal Server Errors or broken redirect paths.
<VirtualHost *:80>
    ServerName ha
    ServerAlias ha.local

    ProxyPreserveHost On
    ProxyRequests Off
    ProxyWebsocketFallbackToProxyHttp On

    # Route WebSockets (Crucial for real-time Home Assistant data)
    RewriteEngine On
    RewriteCond %{HTTP:Upgrade} =websocket [NC]
    RewriteCond %{HTTP:Connection} upgrade [NC]
    RewriteRule /(.*)           ws://192.168.122.166:8123/$1 [P,L]

    # Route standard HTTP web traffic with persistent keepalives
    ProxyPass / http://192.168.122.166:8123/ keepalive=On timeout=600
    ProxyPassReverse / http://192.168.122.166:8123/
</VirtualHost>
Next, enable the new HA web site in Apache2, then reload Apache:
sudo a2enmod proxy proxy_http proxy_wstunnel rewrite
sudo a2ensite homeassistant.conf
sudo systemctl restart apache2
By default, Home Assistant drops proxy connections outside its direct interface layer. Thus, you must declare the KVM virtual bridge gateway loop address inside the VM’s file system layout.
To access the KVM hypervisor interface terminal session directly, run the virtual shell (virsh) utility:
$ sudo virsh console homeassistantThe KVM terminal session will prompt you to authenticate. Enter the username of root, (no password required).
Then, at the subsequent “#” system shell prompt, run the following commands to create a mountpoint directory and configure the HA configuration.yaml file inside that mountpoint:
# mkdir -p /mnt/data/supervisor/homeassistant
# cat << 'EOF' > /mnt/data/supervisor/homeassistant/configuration.yaml
# default_config:
  http:
    use_x_forwarded_for: true
    trusted_proxies:
      - 192.168.122.1
  EOF
Terminate the KVM terminal session using the Ctrl+] key strokes then execute KVM domain reboot sequence:
$ sudo virsh reboot homeassistantReboot your server to force the KVM to load and configure it’s internal resources. This will take a minute or two, so we’ll use the time to configure a Windows desktop PC as our preferred browser to configure the new HA site.
Link Your Windows Desktop PC:
Assuming you’ll be using a Windows desktop PC and web browser such as Chrome or Firefox to view and edit the new HA installation, we need to create an easy-to-remember web alias. The following step assumes we’ll be accessing the HA installation using the following URL: http://ha and the desktop PC’s IPV4 address on your home LAN is 192.168.1.84.
To access the setup using a clean URL shorthand, open your Windows hosts file (C:\Windows\System32\drivers\etc\hosts) as an Administrator and add this entry at the bottom. Replace 192.168.1.84 with your PC’s LAN address:
192.168.1.84 ha.local haNow, opening http://ha in your PC’s web browser should connect your to the HA Welcome and configuration pages seamlessly.
Step 6: Graphical Interface Setup & MQTT Custom Prefix Mapping
Once you’ve successfully connected to the new HA installation at http://ha, you’ll be ready to create your HA administrator profile and install and configure an MQTT service using the HA Settings menu option.
The AlphaMon Platform publishes its data to an MQTT broker using the parameters you’ve specified in the AlphaMon Configuration File. For the following steps we’ll assume you’re using the AlphaMon’s default MQTT settings which will connect your AlphaMon’s data to the public Solargy MQTT broker at mqtt.solargy.com.au.
Next, use the following steps to link HA to the AlpahMon’s MQTT broker stream.
- Navigate to Settings -> Devices & Services.
- Click + Add Integration and search for MQTT.
- Important: If you’re connecting to a private MQTT broker on the same server as the HA KVM, for the Broker field, do not use your public domain IP. Because the VM is isolated, public domains cause loop-back connection drops. So, enter your direct host gateway IP, such as:
192.168.122.1. - Enter your AlphaMon MQTT username and password as found in your AlphaMon’s Config File and click Submit to save.
IMPORTANT: Next, we need to ensure HA’s Discovery configuration matches your AlphaMon’s MQTT_ROOT parameter. To avoid complex, programmer-oriented yaml file editing steps, the latest versions of the HA app includes a feature called “Discovery” which is designed to help HA find your MQTT data and decide how to interpret it. Your AlphaMon is designed to automatically publish the Discovery data expected by HA but it requires a small tweak to your HA default settings.
By default, HA is configured to look for the Discovery data inside a root MQTT topic named “homeassistant“. But, because The AlphaMon Platform is designed to support both secure public & private topic structures, its automated HA Discovery packets are nested inside the root topic specified by your AlphaMon’s Config File in the MQTT_ROOT parameter.
In the following steps we’ll assume you’re AlphaMon is configured to use the AlphaMon’s default, public MQTT_ROOT path of “AlphaMon:Demo“. So we’ll be changing the HA default from “homeassistant” to “AlphaMon:Demo” in the following steps.
On the HA web page, click Configure on the newly made MQTT card, then click Re-configure MQTT. Scroll to the bottom and change the default Discovery prefix from homeassistant to exactly match your AlphaMon’s MQTT_ROOT parameter:
AlphaMon:DemoClick Submit and then Reload the integration by selecting the MQTT service in the HA Devices and Services menu and clock on the three vertical dots, followed by clicking on the “Reload” sub-menu option, and you’re done. Note: You need to Reload the Integration every time you change the MQTT settings.
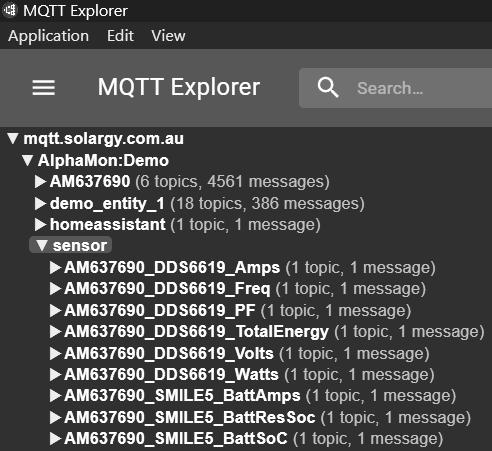
This change forces HA to look for the Discovery data inside the MQTT #AlphaMon:Demo/sensor Topic, as shown in the illustration below. In this image we’re using the MQTT Explorer app to browse the published topics on the mqtt.solargy.com.au server, using AlphaMon:Demo as our root topic. You can see the HA Discovery data for the SinoTimer DDS6619 smart meter and AlphaESS SMILE5 inverter published under the sensor sub-topic. The AM637690 prefix is the unique MAC address of the AlphaMon device that is publishing that data. NOTE: These Discovery topics don’t contain the live data from your AlphaMon’s connected devices; they’re only pointers to the live data, which can be found under the #AlphaMon:Demo/AM637690 topic path. HA uses the Discovery topics to help it navigate to that live data.
Finding Your AlphaMon Device/s
Once your AlphaMon has broadcasted its Discovery packets and Home Assistant has been configured to look for that data in the correct location, you’re ready to complete your HA setup.
To confirm that HA has found and is listening to your AlphaMon, follow these steps:
- Go to Settings -> Devices & Services -> Entities.
- Type the Alias Name of one of your installed Device Definition Files (DDF) into the search block. For example, if your AlphaMon’s Config File
DEVICE_LOADparameter includes the DDS6619 smart meter, you would enterDDS6619in the HA search block. If the connection has been configured correctly your new DDS6619 smart meter tracking tools will appear automatically in HA, with zero programming required.
Creating Your HA Energy Dashboard Tiles:
Next, let’s pin your real-time smart meter metrics directly onto your HA Homepage dashboard layout. For example, if the example DDS6619 smart meter is reading your home’s grid voltage we can use the following commands to display that data on your HA Dashboard. By default, many of HA’s built-in dashboards are per-configured to display default demonstration data, so we have to begin by “taking control” so we can display our own data:
- Click Overview in the main sidebar.
- Click the Three Dots (top-right) -> Edit Dashboard -> Take Control.
- Select + Add Card and click Gauge.
- Set the Entity field to your smart meter entity (e.g.,
sensor.dds6619_voltage). - Toggle Display needle to active.
- (Optional) Set the severity colors: Green for normal grid ranges (230V–250V), Red for grid stress.
- Click Save, and your real-time AlphaMon data grid tile is officially live!
Further Reading & Advanced Optimizations:
- Official Home Assistant MQTT Docs: Deep dive into automated topic schemas here.
- Home Assistant Energy Dashboard: Integrate your AlphaMon sensors directly into the dedicated internal Energy tab to calculate daily costs, solar ROI, and household self-sufficiency percentages automatically.
You can also refer to the Home Assistant Dashboards tutorial which follows on using the SinoTimer DDS6619 smart meter as an example.